Using FinePointe with Biaera AeroMP Exposure Controller
Overview
This technical note details the FinePointe configuration process required to run a study with Biaera AeroMP aerosol dose delivery control.
The Biaera AeroMP system is currently used to deliver aerosol exposures to research subjects based on approximations of the time required to dose an animal of a given size. This approach can result in an exposure that is too long or short depending on a given animal’s physiology and various planes of anesthesia. By integrating DSI’s FinePointe system with Biaera, dosing will be based on a specific animal’s accumulated tidal volume, thus optimizing the aerosol exposure, improving animal dose accuracy.
The following sections describe the necessary steps to complete each stage of the process, which includes:
- Configuring a Dosimetry Hardware site
- Creating a Dosimetry Study with FinePointe
- Acquiring Data with FinePointe
The integrated FinePointe-AeroMP solution is compatible with FinePointe Dosimetry Hardware site. Communication between FinePointe and AeroMP occurs over a TCP/IP server. Once connected, FinePointe sends AeroMP tidal volume information. AeroMP will then send event information to FinePointe which gets saved with the acquired data as System Event marks, annotating the dataset.
Note: The AeroMP apparatus only needs to be configured once, each time the apparatus is physically changed.
Configure a Dosimetry Hardware Site
A Dosimetry Hardware site refers to either a Max II or QT1001 hardware apparatus. In this demonstration, a Max II will be used.
To configure a Dosimetry Hardware site:
- Launch FinePointe Control Panel.
Note: You must be an administrator of the FinePointe Server’s workstation. - Click Hardware Configuration from the main Control Panel dialog.
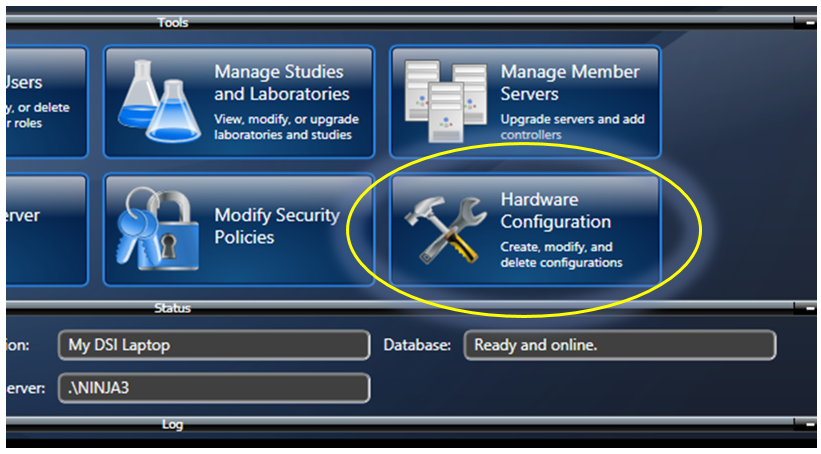
Figure 1. From the main window in the FinePointe Control Panel, click the Hardware Configuration button to create or edit the Dosimetry hardware configuration. - Create a new hardware configuration by clicking the New Configuration button to launch the Configuration Wizard.
Note: An existing configuration may be modified by double-clicking the configuration desired to add Biaera AeroMP aerosol control.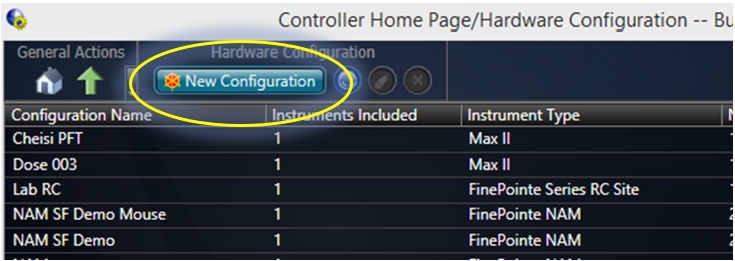
Figure 2. From the Hardware Configuration page, you can create or modify the hardware configurations. - Page 1: Select Hardware
The objective of this page is to select the hardware apparatus to be used in this configuration. - Enter a Name for your Configuration.
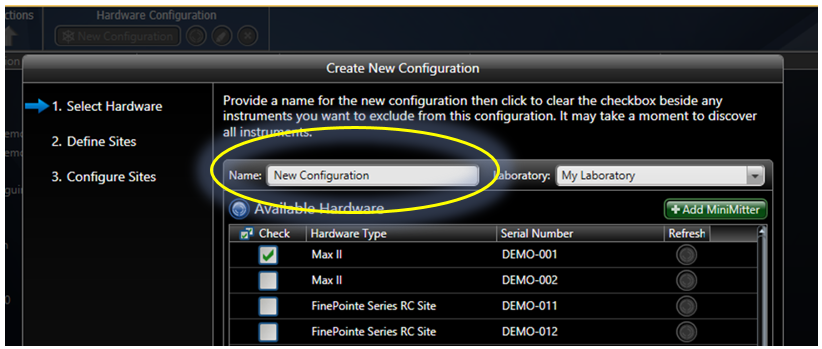
Figure 3. The first page of the Hardware Configuration wizard. Here you need to edit or change the configuration name and select the hardware you will use. Here the Max II demo hardware is selected. - Select the Max II preamplifier as the Hardware Type.
- Click Next.
- Page 2: Define Sites
The objective of this page is to add or remove Hardware sites for each subject apparatus to be used with this hardware configuration. A minimum of one site is required to continue through the Wizard.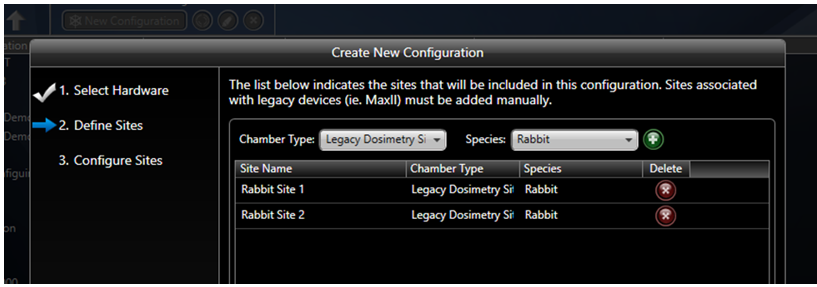
Figure 4. Second page of the Hardware Configuration Wizard allows you to add and remove collection sites for this configuration. For each site, one subject can be acquired during a data collection session. For the AeroMP support, you need to select the Dosimetry Site. - Add a site by selecting the Dosimetry Site from the Chamber Type dropdown.
- Select the Species being used in this Study.
- Click the button to add the site.
Repeat for the number of sites desired. - Click Next.
- Page 3: Configure Sites (Biaera AeroMP Configuration)
The objective of this page is to connect the apparatus (e.g. Max II) to the Hardware sites and to specify any additional information for both the apparatus and the sites.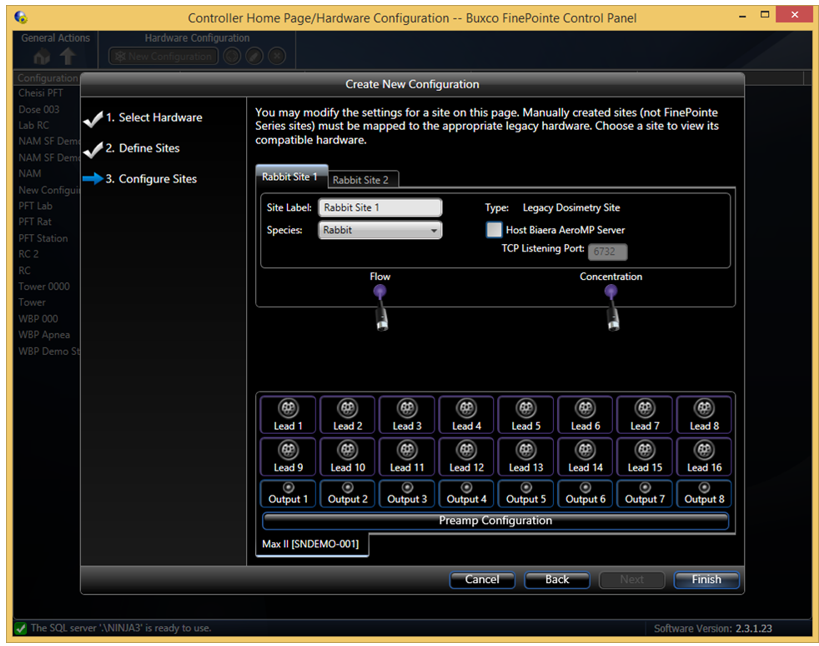
Figure 5. The final page of the Hardware Configuration wizard. On this page, you specify most of the settings for each site in the hardware configuration.
This page is divided in two sections:
- Hardware sites (top) – presents the hardware sites and definitions for the sites defined in Page 2. A tab is available for each site configured. In this example, the tabs are labels “Rabbit Site 1” and “Rabbit Site 2”
- Apparatus (bottom) – presents the Max II input leads and outputs.
To configure Page 3, you need to know to which Max II leads the transducers are physically connected. - Connect the Hardware site’s Flow input to the appropriate Max II Lead by dragging and dropping the graphical Flow connection onto the Max II Lead.
- (Optional) Connect the Hardware site’s Concentration input to the appropriate Max II Lead.
- Repeat for the remaining Hardware sites configured.
- Configure Biaera AeroMP integration:
- Click the Host Biaera AeroMP Server checkbox to enable the feature.
- Specify the TCP Listening Port on which FinePointe will listen for AeroMP messages.
Note: If multiple Biaera AeroMP devices are being used, one per hardware site, a disparate TCP Listening Port must be specified for each. For example, The TCP Listening Port for Rabbit Site 1 is 6723 (Figure 6), which for Rabbit Site 2 it is 6733 (Figure 7). - Click Finish to complete the Configuration Wizard.
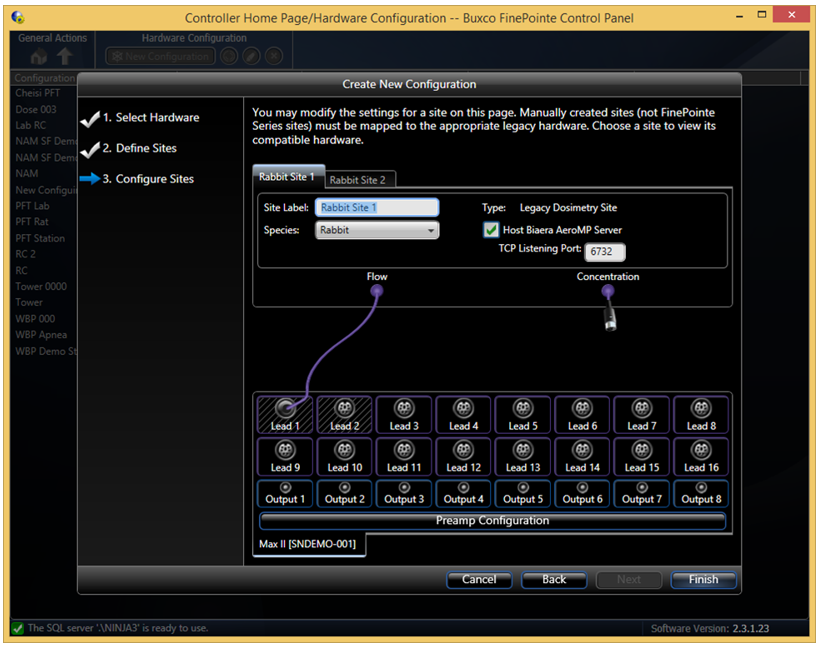
Figure 6. This shows an example setup for Rabbit Site 1 which enables AeroMP support.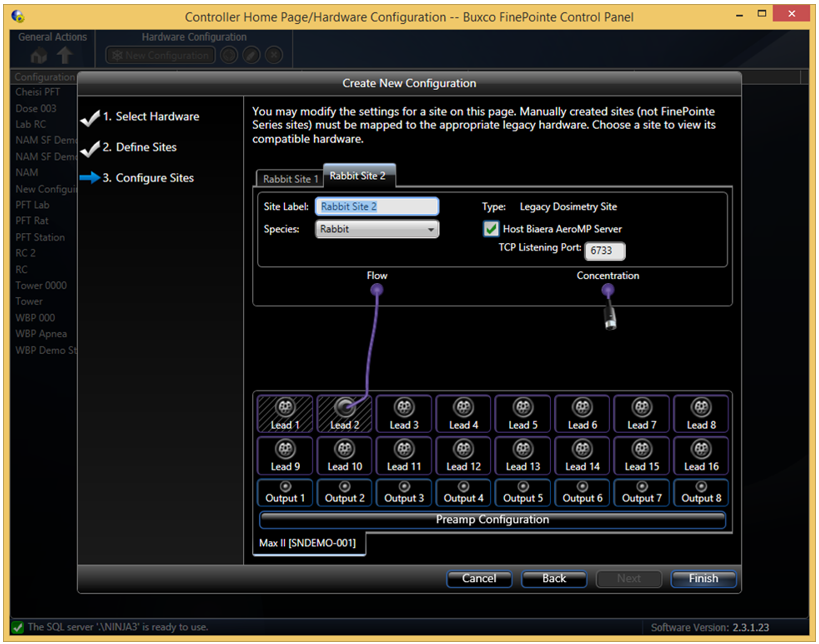
Figure 7. This shows an example setup for Rabbit Site 2 which enables AeroMP support. Note the TCP Listening Port is different from that on the other site.
Creating a Dosimetry Study with FinePointe
For studies utilizing Biaera AeroMP for aerosol control, a Dosimetry study is required to be configured prior to collecting data from the Dosimetry hardware in order to store the acquired data. A Dosimetry study can either be created directly or through the Universal study type. The following process will outline a Dosimetry study configuration using the Universal Study as it permits acquisition from any apparatus type (specified within the Create New Study wizard) and is more flexible with the reporting of data.
To create a Dosimetry study using the Universal Study type:
- Pull down the FinePointe selection under the Create Study Options header.

Figure 8. Select Universal Study on the FinePointe pulldown. - Select Universal Study to launch the Create New Study wizard.
- Page 1: General Creation Information
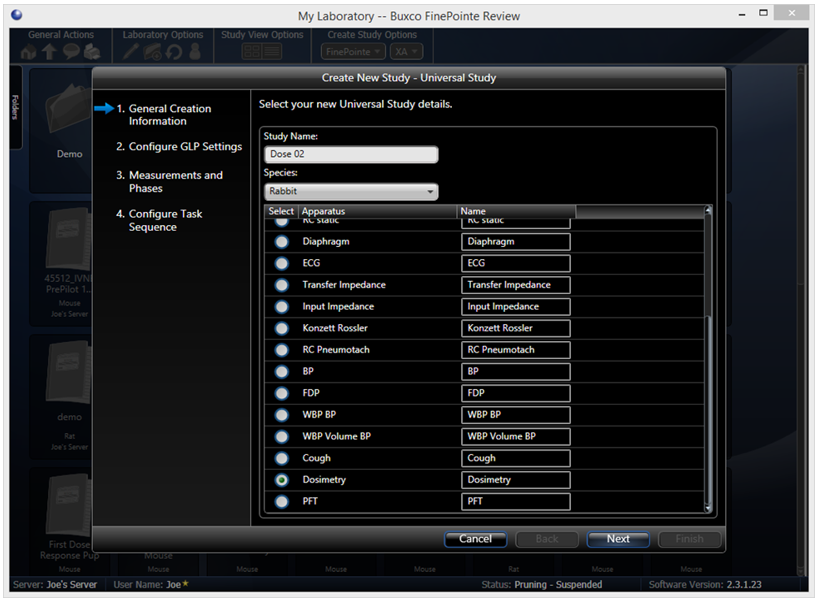
Figure 9. The first page of the Create Study Wizard. - Enter a unique Study Name; e.g. Dose 02.
- Select the Species from the pulldown menu; e.g. Rabbit.
- Select Dosimetry as the Apparatus to use for the Study.
(Required for use with Biaera AeroMP.) - Click Next.
- Page 2: Configure GLP Settings
If GLP options are enabled, this page permits the user to specify GLP options. This will not be covered in this technical note. - Page 3: Measurements and Phases
This page permits the addition, configuration, and arrangement of Phases. Phases are Study Types that may be executed against the subjects with the Study sequentially.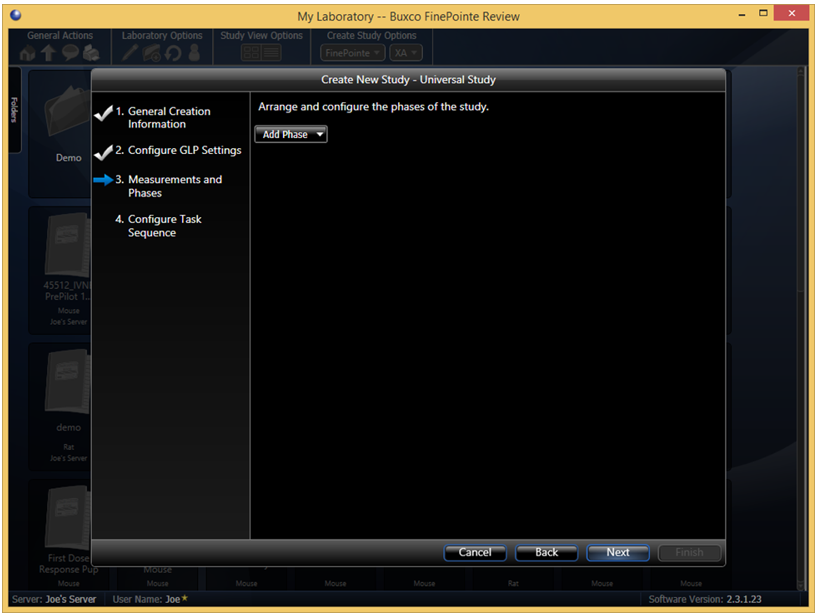
Figure 10. The new Measurements and Phases study page. - Add a Phase using the pulldown menu.
Note: At least one Phase is required. - In this example, the Toxicity Phase will be used.
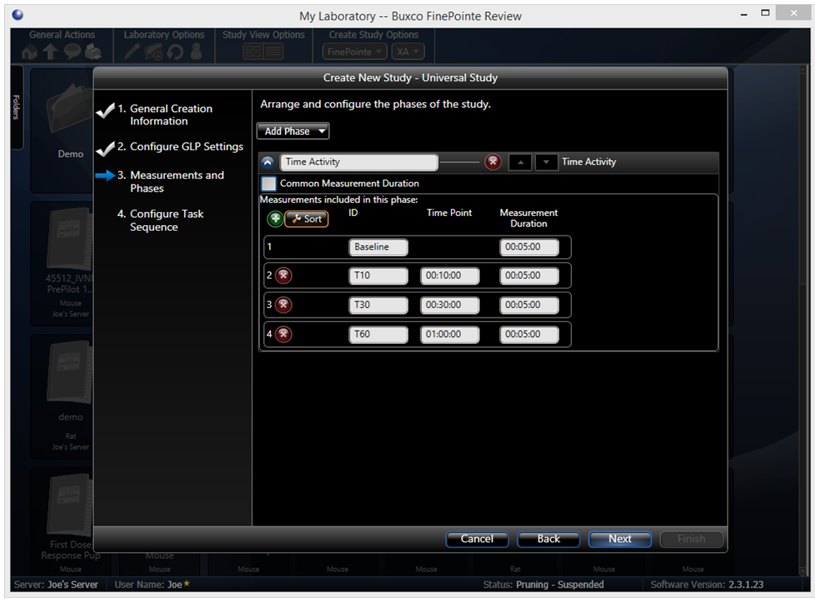
Figure 11. The initial Toxicity phase settings.
The Toxicity Phase runs a protocol that performs the following: - Allow the subject to acclimate to the apparatus for an optional acclimation period, typically 5 minutes.
- Take a Baseline measurement with the duration specified here.
- Wait for the operator to deliver or initiate delivery of a compound.
- Once the operator has does so, press the “►” button during data collection to signal the software to move to the next Phase of the Study protocol.
- From that moment, the system will take Measurements at the designated time points beyond the delivery.
- Measurements may be modified based on the desired Study Design.
- Click Next.
- Page 4: Configure Task Sequence
This page permits configuration of automation settings that apply to all phases.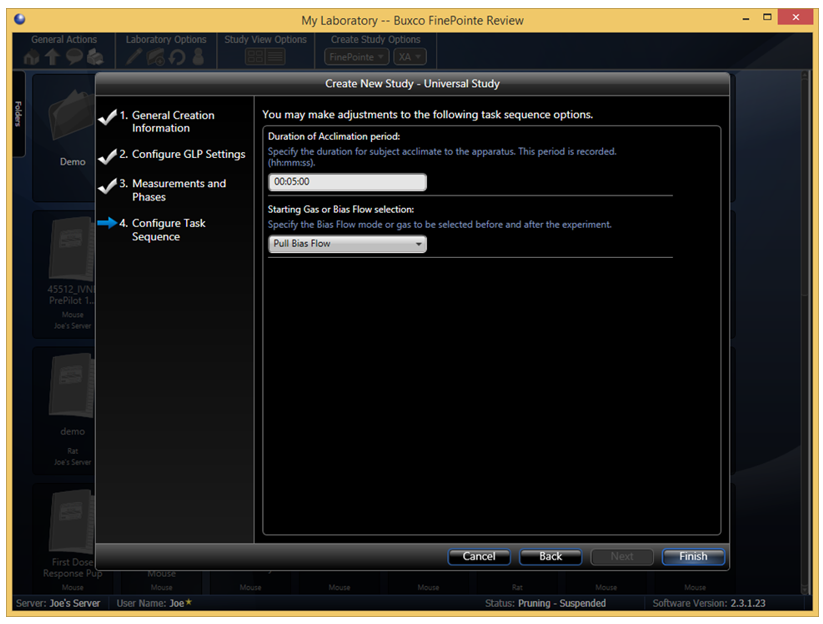
Figure 12. The final page of the Create Universal Study wizard. - (Optional) Define the acclimation period duration. The acclimation period may be ended early by pressing the “►” button during data collection.
Note: The Bias Flow selection does not apply to this situation, so any setting is fine. - Click Finish to open the newly created Universal Study.
Acquiring Data with FinePointe
To begin running the experiment with FinePointe launch the data acquisition engine, Station. This will initiate the data acquisition process.
To launch acquisition:
- Select the Launch Station pulldown under the Acquisition Operations header.

Figure 13. The Launch Station pulldown button in the main Study page. - Choose the Station with the Hardware Configuration Name defined in Step 4 of the Configure a Dosimetry Site section. This will launch the Configure Acquisition Session wizard.
- Page 1: Configure Task Sequence
This page is automatically skipped as the Task Sequence was previously defined as part of the Study Configuration (Step 6 of the Creating a Dosimetry Hardware Site section). - Page 2: Assign Subjects to Sites
The objective of this page is to specify subject IDs for each site. Only sites with defined Subject IDs will be run.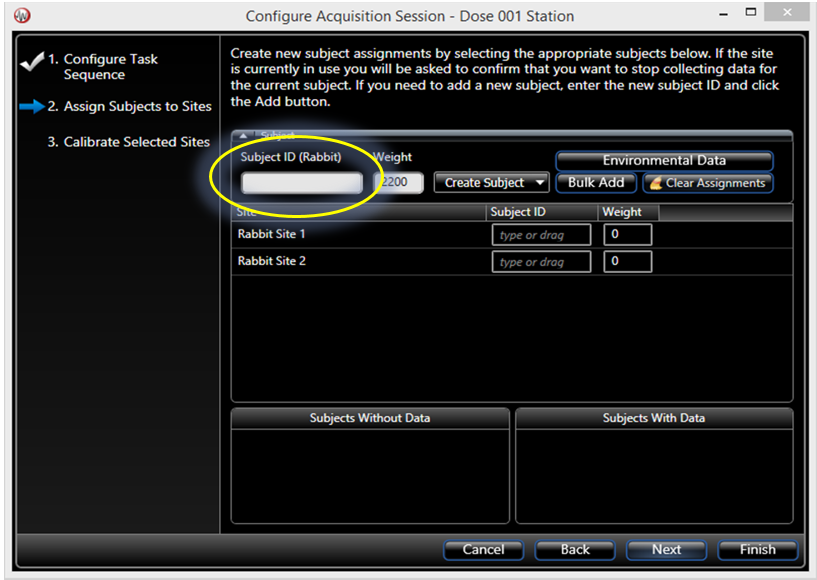
Figure 14. The first page presented when you launch a new data acquisition session. This page allows you to assign subject Ids to each of the site in the hardware configuration.
For this demonstration: - Type a Subject ID prefix in the Subject ID text box associated with the Site; e.g. “ID0”.
- Click Bulk Add. FinePointe will automatically add unique Subject IDs to each site; e.g. “ID01” and “ID02”.
- Adjust the Subjects’ Weight.
- Click Finish.
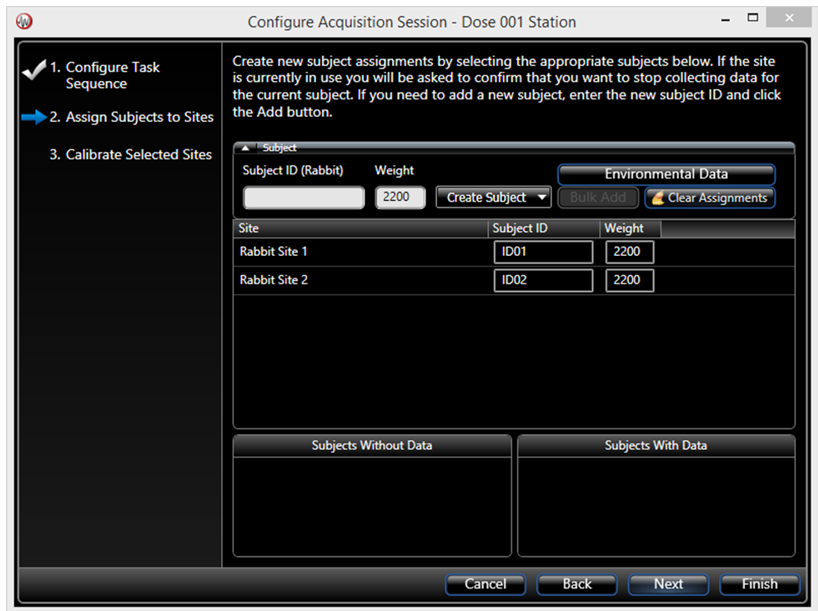
Figure 15. This shows the Configure Acquisition Session form populated with Subject IDs in each site: ID01 and ID02. Only sites with defined Subject IDs will be run. - The Summary window is presented and each Biaera AeroMP instance will automatically connect to their respective FinePointe site. Once connected, AeroMP will begin receiving tidal volume measurements.
- Press the “►” button to begin data collection. To view a detailed window of a particular site, click the Arrow button circled in the picture below. A detailed view exists for each site.
Note: AeroMP will send notifications to FinePointe with aerosol delivery information. FinePointe will add these notifications as Event Marks to the data set and classify them as System Events.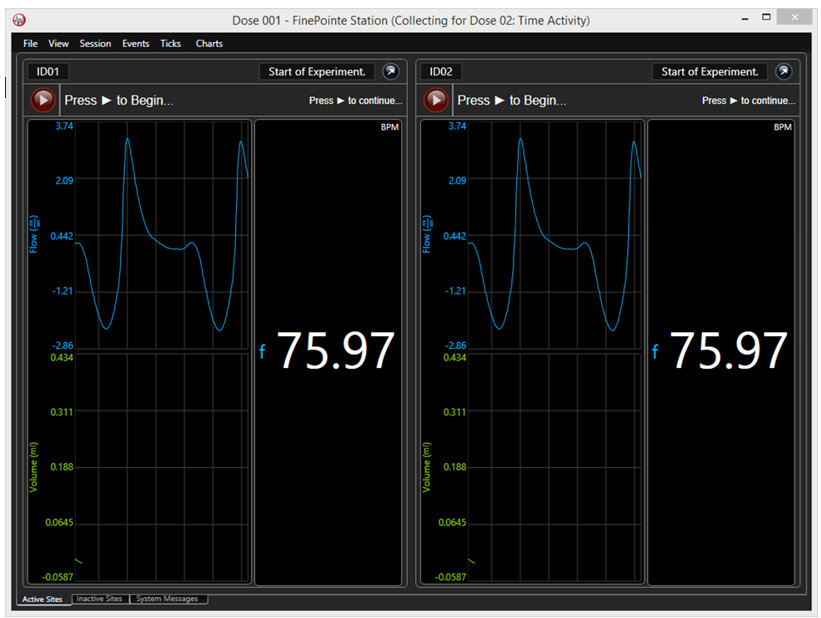
Figure 16. The FinePointe Station Summary window showing 2 sites actively being acquired from.
Comments
0 comments
Please sign in to leave a comment.