Temperature Re-calibration Instructions using Ponemah v6.x
The following instructions outline how to use Ponemah v6.x to re-calibrate PhysioTel Temperature implants.
- Create a New Experiment.
- Launch Ponemah.
- Select Experiment | Create…
- Enter an Experiment Name and Click OK.

- Configure the Temperature implant to an Unconverted signal Type.
- Select Hardware | Edit PhysioTel / HD (MX2) Configuration…
- Configure the MX2.
- From the MX2 Configuration, left click-and-drag the MX2 from the Available MX2s list to the Selected MX2s list.
- Select the MX2 from the Tree view on the left to display the MX2 Details page.
- Select Create New Implant button.
- Configure the Implant.
- Enter an Implant Name.
- Select TA-F40-LF from the Implant Model dropdown.
- Enter the implant’s Serial Number.
- Associate a Receiver to the implant by checking its corresponding checkbox.
- Change the Signal Type of Channel 1 from Temperature (2 Cal) to Unconverted.
- For additional implants, click the Create New Implant button and repeat
steps c.i. through vi. Then click Save & Exit.

- Configure the Experiment and start the Acquisition.
- Double-click the first Subject listed in the All tab of the Sampling Control
- Update the Analysis Module for Channel 1 to Temp.
- By default, the Non-pulsatile Mean (TNPMN) derived parameter will be enabled. This will be used to help obtain the new calibration value during the acquisition.
- Click the Apply to Similar Subjects button and click OK to accept the changes.
- Click OK to exit the Subject Setup.
- Select Setup | Experiment Setup… | Graph Setup.
- Select the Arrange by Signal button to arrange the temperature signals from all subjects onto a single graph. If using more than 8 subjects, adjust the Max per page number to 8 prior to selecting Arrange by Signal to create multiple graphs that include a maximum of 8 signals each to allow easier viewing.
- Enter a Time of 600
- Multi-select the enabled rows with your mouse, right-click and select Set Low. Enter 0 and click OK.
- Right-click again and select Set High. Enter 5000 and click OK.
- Click OK to exit the Graph Setup.
- Turn on the implants and place them in proximity of the receiver.
- From the Sampling Control dialog, select the Start All Continuous Observe the live trace.
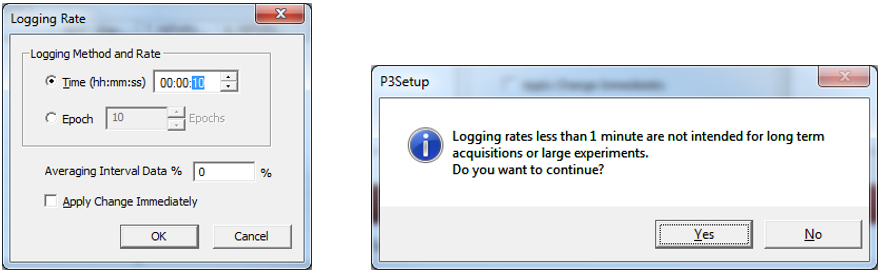
- Select Actions | Logging Rate…
- Change the Logging Rate Time to 00:00:10 seconds and click OK. Click Yes to close the warning.
- Determine the Implants’ New Calibration Values.
- Submerge the implant in a water bath of the temperature corresponding to the new LOWER calibration value (e.g. 5°C).
- Allow the implant to equilibrate from 5 minutes.
- Use the Primary graph and Derived Parameter List View TNPMN value to ensure the signal is stable.
- Use the TNPMN value to choose the raw frequency data that corresponds to the LOWER temperature value.
- Record this value in the table below.
Lower Calibration Value
|
Temperature in °C |
Frequency from T_NPMN |
|
|
|
|
|
|
-
- Submerge the implant in a water bath of the temperature corresponding to the new HIGHER calibration value (e.g. 37°C).
- Allow the implant to equilibrate from 5 minutes.
- User the Primary graph and Derived Parameter List View TNPMN value to ensure the signal is stable.
- Use the TNPMN value to choose the raw frequency data that corresponds to the HIGHER temperature value.
- Record this value in the table below.
Higher Calibration Value
|
Temperature in °C |
Frequency from T_NPMN |
|
|
|
-
- Stop the acquisition by selecting the Stop All Continuous button from the All tab of the Sampling Control
- Reconfigure the Implant with the New Calibration Values.
- Select Hardware | Edit PhysioTel / HD (MX2) Configuration…
- Select the implant from the Tree view.
- Change the Signal Type from Unconverted to Temperature (2 Cal).
- Enter the Lower Calibration Value.
- Double-click the LOWER temperature value (35) to enable the edit field and enter your LOWER temperature value in °C (e.g. 5°C).
- Enter the recorded Frequency into the lower calibration value field.
- Enter the Higher Calibration Value.
- Double-click the HIGHER temperature value (39) to enable the edit field and enter your higher temperature value in °C (e.g. 37°C).
- Enter the recorded Frequency into the HIGHER calibration value field.
- Repeat b. through e. for any additional implants.
- Click Save & Exit.

- Calibration Verification.
The implant(s) is now calibrated to its new temperature range. It is recommended to verify the temperature accuracy throughout the range over which it was just calibrated prior to implantation and commencement of a study.
Can't find what you're looking for? Contact Us
Comments
0 comments
Please sign in to leave a comment.