SEND Setup
SEND SETUP FROM PPP3 SETUP
In order to create SEND output, users must have enabled Data Reduction, selected derived parameters in the Channel Input Setup menu that correspond to output designated by CDISC, and performed a Save of the data while in Review (Save Marks Section, Save Derived Data, or Save Run).
SEND output can be generated within our outside of the Study Protocol Option (Study). This section will describe how to set up components that are used both with and without Study. Specific use with Study will be described in a later section.
SEND DIALOG
SEND can be configured in idle mode and saved as part of the protocol or modified after collection in Review. To modify SEND settings, select P3 Setup from the Setup pull-down menu and click on SEND in the tree-view menu on the left-hand side of the dialog. By default, SEND will be disabled. In order to edit, select “Enable SEND Output”. Once enabled, fields will become editable.
Definitions for the functions displayed in the SEND dialog are listed below.
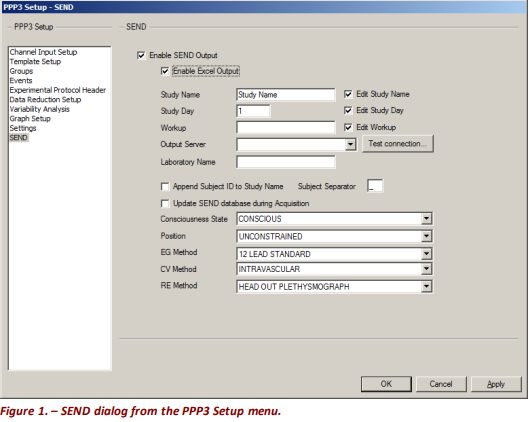
1 – Enable SEND Output
Toggles the ability to modify the editable fields displayed in Figure 1 and controls whether or not SEND output is turned on or off.
2 – Enable Excel Output
SEND output can be ported to Microsoft Excel along with the derived, log, and subject information currently created when saving a Marks section, Derived Data, or a Run (within Study). If enabled, a new worksheet for each SEND domain will be created within the Excel workbook that contains SEND information along with the expected Derived, Data Reduction, and Experimental Log information. Refer to section SEND Export To Excel for details on the output generated when enabling this feature.
If this option is not checked, SEND output can be generated by creating a CSV file using SEND Viewer (see SEND Viewer below).
3 – Study Name
Allows the user to create a unique study name for the SEND output. If using the Study Protocol Option, this information will be automatically pulled by the software. However, the option to modify the Study name is possible by checking the box next to the edit field. This may be needed to further define a set of data or update an incorrect Study name that may have been created.
4 – Study Day
The day of collection may be entered here. Note that CDISC does not recognize Day 0. If using the first day of the study collection, a “1” should be entered. If using the Study Protocol Option, this information will be automatically pulled by the software. However, the option to modify the Study Day is possible by checking the box next to the edit field. This may be needed to further define a set of data or update an incorrect Study entry.
5 – Workups
Workups can be manually defined, or If using the Study option, this information can be automatically pulled by the software. If pulled from Study, users can modify the workup name used in Study by checking the box next to the edit field.
6 –Output Server
Permits defining a dedicated server or workstation as the primary repository for SEND data. Additionally, the SEND instance name, as it is installed with the application, must be appended to the server/workstation name. Example naming convention would be “server name\P3Plus_V2”. P3Plus_V2 is the SQL Instance used by Ponemah for SEND related data.
NOTE: It is important to note that this functionality is only available if the SEND SQL Server Option has been enabled in the license file. If only SEND Output is enabled, this feature will not be available.
7 – Laboratory Name
Allows a unique identifier to be manually entered which will populate the EGNAM variable in the SEND output for the EG Domain. SENDIG 3.1 at this time does not have a variable name for laboratory name for the RE (respiratory), CV (cardiovascular), or VS (vital signs) domains.
8 – Append Study ID to Subject Name
Will append the Subject ID to the Study Name in the SEND output. By default, the separator is “_” but can be changed. This modifies USUBJID in the SEND output for the domain.
9 – Update SEND database during acquisition
Generation of SEND data will typically be generated during Review after post processing the data. However, there may be instances where post analysis of the data is not needed such as in short duration, Tox applications. Enabling this checkbox will allow data generated during acquisition to be used by SEND.
10 – Consciousness State
Pull-down field allows selection of CDISC controlled terminology that represents the state of the animal, such as conscious or unconscious. These definitions are managed in the Controlled Terminology dialog.
11 – Position
Presents a pull-down menu allowing the selection of CDISC controlled terminology that representsthe subjects position from unconstrained to various restrained states. These definitions are managed in the Controlled Terminology dialog.
12 – EG Method
Allows the selection of the CDISC controlled terminology that represents the ECG lead presentation used for collection. These definitions are managed in the Controlled Terminology dialog.
13 – CV Method
Allows the selection of CDISC controlled terminology for definition of pressure measurements. These definitions are managed in the Controlled Terminology dialog.
14 – RE Method
Permits selection of CDISC controlled terminology such as Head Out Plethysmograph, Whole Body
Plethysmograph, or Invasive to describe the respiratory system being used. These definitions are managed in the Controlled Terminology dialog.
Groups
The Groups dialog allows the user to control the Group name and dose which is associated with a given Subject. In order to edit the Study Subject Name or Study Dose, click in the edit field under the appropriate column. Figure 2 shows subjects one and two (Group A and Group B) with the names and doses modified.
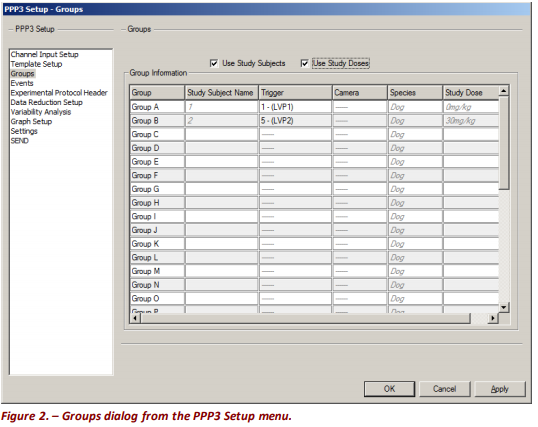
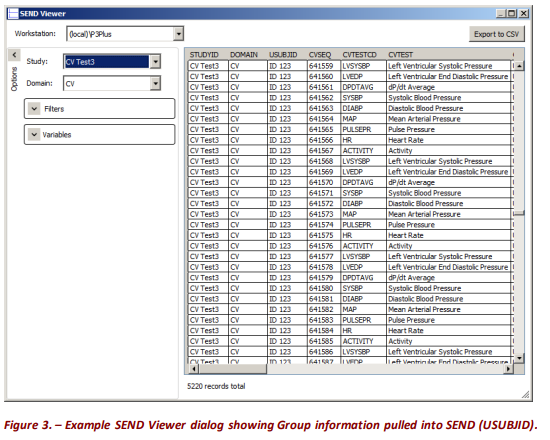
Providing a unique name in the Groups dialog will propagate the subject information to SEND. Below shows example SEND output where Group A Study Subject Name was changed in the Groups tab (Figure 2). This identifier, ID 123, is shown under USUBJID in Figure 3.
Two check boxes are available at the top of the Groups dialog, Use Study Subjects and Use Study Doses. These two features are related to data generated using the Study Protocol Option. If enabled, Subject and Dose information entered in Study will be automatically pulled into the Groups tab. When these features are enabled, manually editing Study Subject Name and Study Dose will not be permitted. However, it may be necessary to update or correct information that was entered incorrectly into the Study Protocol Option. If needed, uncheck these boxes and enter the appropriate information manually. When these boxes are unchecked, the column headers revert back to the default values of Name and Dose. If not using the Study Protocol Option, these features do not need to be enabled.
1 - Use Study Subjects
Subject information defined within the Study Protocol Option can be automatically pulled into SEND output by selecting this checkbox
2 – Use Study Doses
Dose information entered within the Study Protocol Option will be pulled into SEND by selecting this checkbox.
Data Reduction
Data Reduction must be enabled for all desired subjects in order to generate SEND output. Only parameters defined by CDISC will be available in the SEND output.
With SEND enabled, users can no longer create user specified labels as that will be handled automatically to conform to SEND requirements. When SEND has been enabled, Data Reduction will display “SEND compatibility enabled” at the top of the dialog to notify users that they will be complying with SEND requirements and some functions will not be able to be modified.

Several features have been added to the Data Reduction dialog to provide details on the data generated for SEND output.
1 – Timing Reference
The Timing Reference selection determines the point on each data reduction interval that will be used to report timing information for the interval (Figure 5). This is used to define Data Reduction labels along with TPT and ELTM.

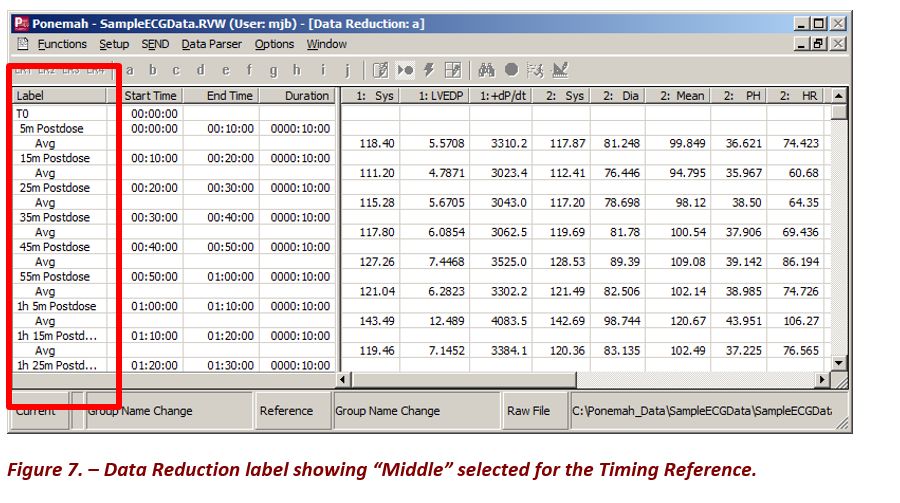
Three selections are available which include Start, Middle, and End. The selection chosen will update the Data Reduction label to display the time information at the start of the logging interval, the middle of the interval, or the end of the interval as shown in Figures 6 and 7.
Figure 6 shows labels starting at 0s and incrementing by 10 minutes (10m, 20m, 30m) as dictated by the “Duration of Interval” chosen by the user.
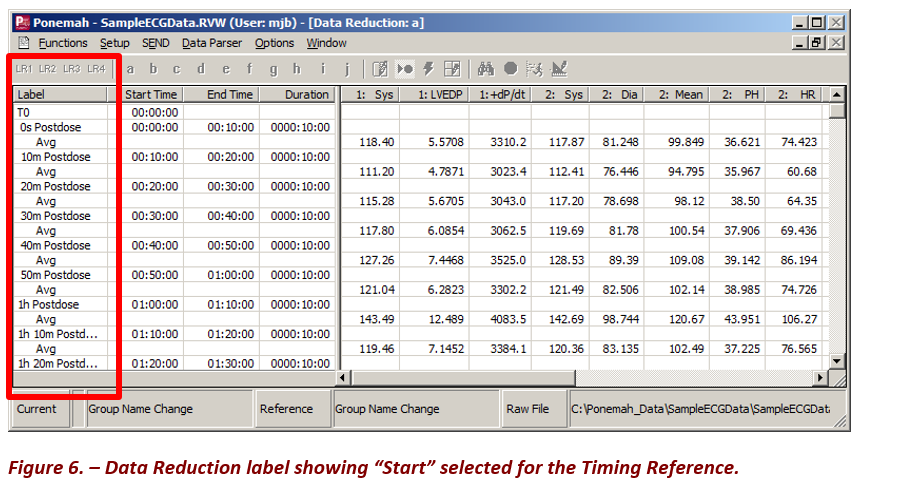
Figure 7 shows the same Start Time, End Time, Duration and averages for the data, but the label has been modified to display the “Middle” selection. Since the duration of the averaging interval is 10 minutes, selecting Middle will update the label information to specify the middle of that logging interval. Figure 7 shows those updated labels starting at 5m and incrementing every 10 minutes (5m, 15m, 25m, etc.).
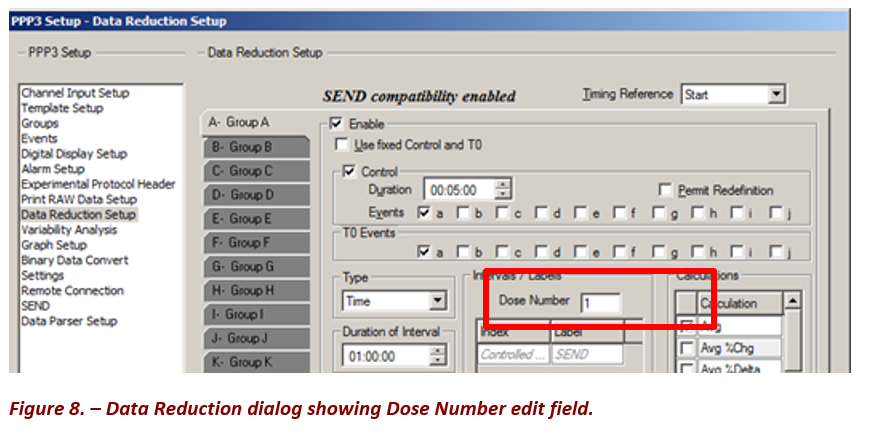
2 – Dose Number
Dose Number is manually edited and refers to the dose that will be referenced in the SEND output. The dose number listed here will be placed in the SEND output under TPT. By default, the value is “1” but can be modified to represent the desired dose if multiple dosing events occur in a single day. If SEND is not enabled in the SEND dialog, this field will not be editable.
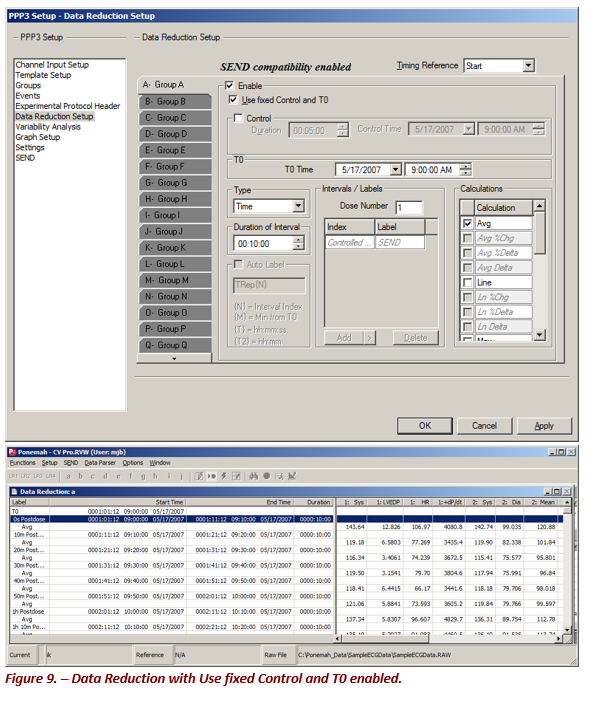
3 – Use Fixed Control and T0
The Use Fixed Control and T0 function allows the designation of the start of the Data Reduction without the use of an event. Entering in date and time into the T0 Time edit fields will trigger the start of Data Reduction. When using Time as the Data Reduction “Type”, all labels will be controlled by Ponemah for SEND compliance.
A time of 9:00AM was entered into the T0 Time field. In the list view dialog, the “0s Postdose” label is entered and controlled by Ponemah and the first logged line of data is at 9:00AM. All subsequent intervals are based on the Duration of Interval configured.
Parser Segments can also be configured and used for Data Reduction. When using Parser Segments, the ability to add user defined labels is permitted. Figure 10 shows the Add button expanded under the Intervals/Labels field. All labels manually entered here will be fixed in the Data Reduction list view and any additional reduction line labels will be handled by Ponemah.

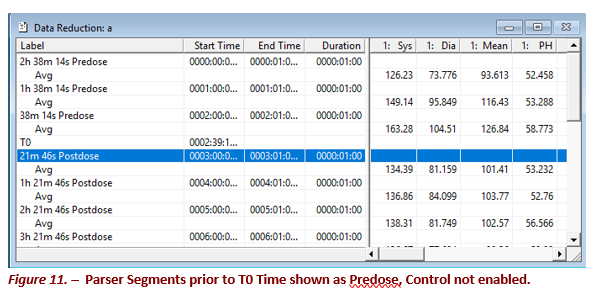
If Use fixed Control and T0 has been enabled, any parser segment prior to your T0 Time will be listed as a “Predose” time point. If Control has been enabled, the parser segment prior to your T0 Time will be used as your control value. If parser segments exist before the Control segment, they will be labeled as Predose.
Comments
0 comments
Please sign in to leave a comment.